Monday, 29 August 2011

my re-upholstered dining chair - with how to pictures

How I transformed this chair.....


Almost 2 years ago I started an upholstery class, run by the council, here in Birmingham. I used to go every tuesday after work and no matter how rubbish my day at work had been i could totally forget about it once I got to the class and started using may hands, and my brain, to creative something. 


This class was really the first real 'creative' thing I had done for a really long time. Up until that point it had all been about physio - all day at work and then at home too while I studied for extra qualifications.


I guess this was the first time I decided enough was enough and it was time to do something creative again. 


Here are some pictures from an earlier project I finished.....this little low seat which I thought was so cute and reminded me of 2 little chairs that are in my mum and dads house...love a bit of nostalgia!


I was a complete beginner with no previous skills in upholstery but my teacher was great and really patient with me. Here is a previous blog post about my first projects of a little piano stool and box. 


My blog post from April had the story so far with my dining chairs. I rescued a set of four free when the old folks home my Mum was working in was closed down and they were chucking out a tun of really amazing stuff. So the last post left that chair looking a little like this.....
with loops ready to put the next layer of horse hair in


so handfuls of horse hair are stuffed under these loops and once the entire chair is covered it is teased out to make it look even both sides and to check there are no major holes or gaps anywhere

next two layers of this cotton fleece is placed over the top to that your bum doesn't get pricked from horse hair. I also realised later down the line that it needed to go around the sides too.

This next bit got complicated.. i had to inset the fire retardant calio and top fabric at the same time as a small strip of wood needed to be inserted and screwed in to secure the fabric to the back panel of the chair. I figured out that if I cut these sort of 'V' shapes in the fabric then it would all work out (this took ages and a lot of trying to visualise things in my head) 

So you can kind of see the strip of wood tucked in there

This this is what it looks like from the top, it means you get a nice crisp clean edge at the base of the chair.

I then had to fold and pin the top fabric out the way while I tensioned the calico

so this is the side of the chair and my trying to get the calico to sit right

temporary tacked with edge folded under

 I went round and temporary tacked the calico down all the way round the chair

The next bit takes ages.....tensioning the calico. There is really no quick way to do this. You just have to got round each edge of the chair pulling the calico tighter, removing the temporary tacks and then re-tacking to hold the new tension. My teacher always used to say if you can pinch an inch in the calico then it is still too slack. It is worth spending time on this. Get this right and your top fabric will sit nice and smoothly on top. get it wrong and you have to just look a saggy-ness forever - not good!
so this is it temporary tacked all the way round, still corners to fold in though

then this is the tacked hammered in to secure it.

this is the little back section

using a craft knife I cut off the skirt bit.
then unfolded the top fabric and got it lined up.

Using gimp pins which have a smaller head and are more subtle I tensioned the top fabric which is really easy as all the work has already been done with the calico


then just trimmed this with my craft knife

and added this beading on the top to hind the gimp pins. It comes in handy strips so you don't need to hammer in lots of individual beads.

ta-da my finished chair! 
I'm really pleased with it! Just got 3 more to go now. I have one that just need the calico tensioning and top fabric and two that are still in their original dirty dusty state. Defiantly an outside job to strip them down!

Tuesday, 23 August 2011

made in the shade - what a find

Last week while surfing the net I made an awesome discovery...Made In The Shade...
How lovely is this - from made in the Shade
Their website is awesome and really grabbed my attention with all their little quirky images and funky fonts. 
Imagine my excitement when I realised that they were based in Glasgow (where I'm from) and even better....I was going home to visit at the weekend so I didn't have to wait long at all before visiting their real life shop-woo hoo!


They have the cutest little shoppe in De Courcy's Arcade called The Maisonette which is packed full of crafty and vintage inspired handmade goodies and lots of inspiration. 
I could have bought one of everything in the shop but had to resist and left with this little brooch making kit which I'm so excited about stitching up later and a back issue of Selvedge for a bargain price of £6. Its the first time I've got a copy of it...always heard so many people talk about it and felt like I've been missing out a bit....so excited about reading it cover to cover......The strap line at the bottom of the magazine says.."The Fabric of your life:Textiles in fashion, fine art, interiors, travel and shopping"  - right up my street!


My day of exciting finds didn't finish there...while wandering around the west end a was handed a leaflet for "Granny would be proud - vintage art and craft fair" at the Hillhead Bookclub. what a treasure trove of cool stuff they had but I couldn't help but pick up a few of these vintage knitting patterns.


I stopped at 3 but could have bought the whole folder the seller had! The poses they have are the funniest thing! 


Then how AMAZING when I got home and showed my Mum she said she had loads of them out in the garage! Whoop whoop! so I've now got quite a collection - just need to get knitting!


Monday, 22 August 2011

I knitted my way to Scotland

Another long journey in the car this weekend up to Scotland. Managed to leave Birmingham by 5pm which has broken all records for us so far and finally made it Scotland about 10.30pm.


Not content with sitting doing nothing, as my hubby drove, I clicked and clacked my knitting needles together  - what better way to pass time when your stuck sitting down for 5+ hours! Although it got dark after a while and I only managed one row in the dark..... so had to just snooze after that!


I've been slowly working my way through the cushion cover designs in the Amy Butler Midwest Modern Knits book. Some of you may remember my knitted cushion cover post from June where I managed to figure out how to use the cable needle. My knitted mug snug is from the same Amy Butler book too.


Monday, 15 August 2011

Tutorial: how to make 17 block printed tote bags

My big sis is  having a festival themed party next weekend and as the name of her house is 'Glencairn' she has called the party 'Glencairn stock'.


It should be a fun packed day with various things going on from corn hole-ing, noodle station, decorate your own cupcake, BBQ, live music (still to be confirmed) and a craft workshops.  I've been delegated craft area - which will be known as 'The Craft Shack'. So my plan is to have a knit your own flower brooch workshop and a jewellery making workshop.


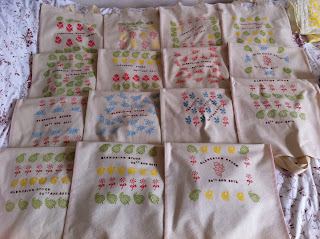
I've also been busy all weekend making 17 souvenir tote shopping bags which will be sold for charity. It's been fun but I was getting a bit tired towards the end. 


If you fancy trying something out similar yourself its easy once you get in the flow - here is how I did it.....


Materials and equipment
calico
bias binding
cotton woven bag handles
thread
block printing things (fabric paint, wooden block prints, sponges)
sewing machine
scissors


 First of all I prepared all the materials, cut bags out to size, your choice of size really, I modelled it on another bag I had which is 32x41cm when finished so you need to add on a bit of seam allowance. 
To minimise fabric wastage I took the width of the fabric and quartered in, that way I didn't have any left over. 
My work station, ready to print my designs

Next put your design on the bag. I used wooden block prints with fabric paint. It takes a bit of practice to sponge the paint evenly on the stamp so have a rag close by for practice dabbing.


Really the possibilities are endless though....applique....machine embroidery...whatever you fancy.

Next I pinned the bag, right sides together and stiched up the sides, right to the top.
Next I stitched on bias binding to hide the raw edges. Choose whatever colour or style you want. As I was making a lot of bags and I wanted to keep costs down I just bought cheap stuff. This is a great tutorial to make your own bias tape, which means you can incorporate some of your fav fabric into the bags!

The quick way I found was to fold the tape and just hold it in place then put it under the foot of your machine to hold it. Then stitch away and just keep ensuring it stays in line right to the bottom. I wasn't sure if this would work at first but I managed just fine and it saved loads of time pinning first. 

Next I ironed down the top, just 1cm or so first then about 3 cm.
Next up to stitch the handles on..I used 80 lengths of handles but you could use whatever length you wanted depending on how you were going to use the bag. 
I tucked the end under the lip I had created to hide raw edges then pinned it in place.


Using one continuous line of machining I went round the bottom of the lip I had ironed and to secure the handles stitched a square with a cross in the middle. Just make sure your needle stays in the fabric, lift up the foot and swivel your fabric round to change direction.


And repeat as many time are you want, in my case 17!