How to pass a 4 hour train journey......I went back home to Scotland last weekend and eventually managed to figure out how to do intarsia knitting and think I've just about mastered how to use a cable needle. I've been following patterns but hopefully once I get a bit more practice in I can plan out my own designs.
These two projects will be cushion covers eventually. Going on holiday to south Africa at the weekend for a few weeks so may get a chance then to work on them.
This is the video for how to knit intarsia that finally helped me work out what I was doing.
http://www.youtube.com/watch?v=gK07PBQMTE8
A bit hot for this jumper now but this is the first jumper I knitted last winter..
Thursday, 21 April 2011
Thursday, 14 April 2011
soft furnishings
Here is a few pictures of some soft furnishing bits and pieces I've made for my little house.
Some cushions (not the pink stripy one) that match in with the blind that I made with my mum.
Some cushions (not the pink stripy one) that match in with the blind that I made with my mum.
With the left over fabric from the small chair and box I re-upholstered last year I made two cushion covers, not decided where they will go yet though.
I made curtains for my bedroom so here are the tie backs and cushions I made to go with them.
And here is the bathroom blind closed...
Tuesday, 5 April 2011
knitted mug snug
Monday, 4 April 2011
Screen printed roman blind
Today was my first official week day of not being on annual leave...just not working on a Monday! I finished the blind for my bathroom that I've been working on. I hand screen printed the fabric at my textiles class and today stitched it up into a blind.
 |
| Because the screen was bigger than the stencil I had to use paper to cover up the prints as I went |
 |
| The next week, once the first prints had dried I filled in the gaps with the second colour |
 |
this was the practice prints |
Friday, 1 April 2011
Re-upholstery of set of 4 dining chairs, story so far..
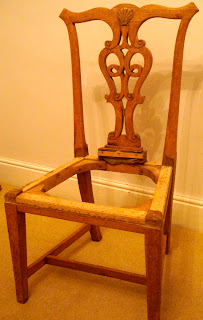
A year or so ago I got a set of 4 dining chairs for free from an old nursing home in Glasgow that had closed down and was chucking out loads of stuff.
 |
| This is the inside of the chair pad, Full of very stinky dusty dirty real horse hair..... |
 |
| I sanded down the chair frame and waxed it which gave it a much lighter colour |
 |
| Next stage was to re-web the chair |
 |
| Then sew new springs in |
 |
| Then tie them down |
 |
| Next the horse hair gets sewn in |
 |
| and tied down to give a firm edge. |
 |
| This is where I'm up to so far, ready for the next layer of horse hair. I also have to decide what the final fabric will be and I have to fix this in at the back first. |
 |
| I've got enough of this stuff to cover all fours chairs |
 |
| It looks quite yellowy in this picture but I think I might prefer this one, only thing is I've only got enough to cover two chairs in this one. |
Re-upholstery projects - piano stool and storage box
This is some before and after shoots of two re-upholstery projects that I worked on last year. I got the stool and box from a junk shop for £25. I hadn't done any re-upholstery before so these were my practice items.
 |
| The wood was really dark so I sanded it down and used wire wool and wax to seal it again. |
 |
| I used a rubber type padding and then covered it with calico first to give it a fire retardant. |
 |
| This is the finished stool with stud strips round the edge. Makes for a useful extra seat in me little living room. |
 |
| Ugh! plasticky fake leather and a bit stinky, this is the box before. |
 |
| And the end product. Harder than you would think to get those stripes to match up! |
Subscribe to:
Comments (Atom)


