Monday, 13 February 2012

Rag dolls and scrap mice

I think that there is something so nostalgic about handmade toys. Last year I helped clear out my parents attic, which was packed full of just about everything from my childhood. My Mum has squirrel tendencies, it seems. Me and my sister found all sorts of stuff in there....old school books, little shoes, journals, toys, toys and more toys. 


Yeap...I was one lucky kid! I had so many toys, and there they all were covered in dust and a bit faded. I had cuddly bears, little polly pockets, a giant tea cup that was a house...the list goes on. Then I found Diane, the rag doll my Mum had made for me. I flippin' loved that doll. I made little outfits for her, fed her, put her to bed...she went everywhere in her hay day! And out of all the toys that were unearthed that day she was defiantly on the keep pile.


She even had sweet little leather shoes!

The little mice cover project from this months Mollie Makes reminded me of my rag doll. 

I decided to make the mamma mouse and it was great to make something that used up all my scraps and really satisfying to have a cute little mouse at the end. Now I just need to find a little person to give her to. 


It got me thinking about handmade toys in general. So much of what we buy from food to clothes and toys now just ends up in the bin, but having something that is handmade, especially when shard between family and friends has a value you can't put a price on. 

Do you have a favourite toy from your childhood thats handmade? Or would you like to make something for your own little ones? When I open up my new crafty venue in the summer time I want to make sure that the workshops I have on offer are what my customers would love to make. Would you like to see toy making on the programme? If so I would love to hear about it in the comments section below.....

Wednesday, 8 February 2012

Sublime Stitching Sushi napkins

Have you seen the Sublime Stitching range by Texas based stitcher extraordinary Jenny Hart? After trying embroidery for the first time in 2000, Jenny has been revolutionasing the stitching world since with her alternative approach to embroidery patterns. All you have to do is pick the 'theme' that you want to stitch from a huge range including classics like the tattoo alphabet and craftopia to scooter babe, roller derby and vintage lamps. Or maybe something completely different like vital organs!? Whatever you fancy...there is something for everyone, with over 50 choices!

When I visited the hugely popular Make Lounge in London last year I spotted these cool crafty packs and snapped up the sushi themed one. Each pack comes as a sheet of hot iron transfers. So you just cut out the image you want and then iron it onto the fabric you want to stitch. It gives you an easy pattern to stitch round so you end up with a lovely little stitched image.

I decided to stitch my sushi onto napkins. I LOVE sushi, and after going to a sushi making lesson for my birthday a few years ago with the amazing Kumiko Haton in her Glasgow home, I make my own sushi quite often....


...so though it would be good to have some matching napkins!? Using some white cotton linen I had I cut out 4, 45x45cm squares. I finished off the edges and neatened them with mitered corners.

I then choose my designs and ironed on the transfers to the corner of my napkins and I was ready to go! This is a fantastic website giving really clear instructions with pictures of how to do just about every embroidery stitch you could ever want.

I used mostly used simple backstitch but also satin stitch and a few french knots. Here are my finished designs....


Tuesday, 7 February 2012

How to make a mitered corner - tutorial

Finishing off the corners of your projects neatly can give your projects a really professional look. It might be a napkin set, table cloth, an apron or on a piece of clothing.  It can be tricky though if you've not done it before.


This is how I have worked out how to do it after a bit of trial and error. It can be a bit time consuming but I think it is worth it.


First of all fold and iron down just under 1cm all the way round the edge. Make sure you check what the right side of the fabric is and fold in towards the wrong side....

 Then fold and iron down again....

 With right sides together, fold each corner and pin like so...

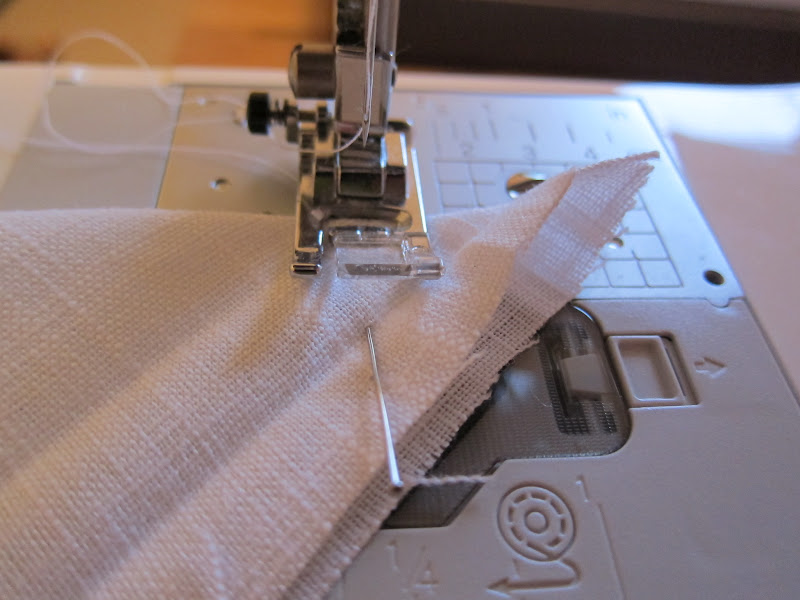
 You can just about see the creases where you ironed the folds. Starting at the folded edge, sew at a 90 degree angle. Use a pin to help guide you....

 This bit is important, only sew between the two crease lines, DON'T sew right to the edge! Also make sure you use the reverse stitching function on your machine to make sure the stitches don't come loose.

Next trim off the corner about 0.5cm from your stitching line.....
 Then turn inwards to hide the seamed edge....

 Then fold inwards to hide all raw edges and pin down. Obviously repeat on all corners before finishing off.

 Then finally stitch all the way round wrong side face up and there you have it! Neat mitre corners with no raw edges!


Now you can make all your projects look great round the edges.

Monday, 6 February 2012

What to do with crochet granny squares?.......Bunting!!

Before I left to go on my South American adventure last November I got together a crochet project ready to take with me. I had been knitting and sewing so much before I left that going away for 7 weeks without doing anything crafty seemed pretty hard. 


I had bought the gorgeous 'Cute and Easy Crochet' book by Nikki Trench not long before I left and decided to take some supplies with me to make one of her throws (see previous blog post). 


The same throw was recently featured in Mollie Makes Magazine
I knew there would be long plane and bus journeys so thought it might be a good way to pass some time. Unfortunatly my little scissors got confiscated at security at Birmingham Airport (too pointy apparently) so I had to buy a nail clipper to cut my yarn...quite effective once I got the hang of it! 


So I had great intentions...had all my yarn ready....colour scheme decided...copied out the pattern...had my nail clippers and hook...
The yarn I used was Amy Butler belle organic aran for Rowan 
......hmmmmmm, things didn't quite go as planned....I managed to make about 20 squares in total...... 

 So all this yarn had a lovely trip too...being stuffed in my rucksack for 7 weeks....

I think its hard to just have one project on the go at one time. I missed my vintage top I was knitting before I left...but I could't have brought that too!  


So for all of you out there who have more that one project on the go...good for you!! Variety is the key I say.... especially when it come to me and to crochet. 


So instead of making up the throw I decided to so something that had more instant results.....bunting! Everyone loves a bit of bunting and using crochet squares makes for a good alternative to the traditional triangle ones. 


Friday, 3 February 2012

Leather Purse - with two section snap frame

I love getting a new purse...I think it gives you a chance to clear out your old one, get rid of all those tattered old receipts, out of date vouchers, expired loyalty cards...and if your lucky you might even find a scrumpled up tenner!

Coin purses with clip frames seem to be getting more and more popular. Those of you whole follow Mollie Makes Magazine may remember the free gift coin purse kit from issue 6. Of course I had it made up within a few days.... but I tend to carry more bits and bobs in my purse than would fit in this little one.

So I decided to experiment and make a bigger one! I found a lovely double pocket clip frame from U handbag which arrived in no time at all...then I had to work out how to to create a purse that had all the little pockets and sections I needed.


I'm really trying right now to use up stuff that I have already...I like buying new fabrics, trims, ribbons, buttons...(I could go on)...as much as the next craft fiend but sometimes I forget how lovely a lot of the stuff I have already is.


So I had a rummage...last year when clearing out my parents loft I found a huge basket of leather cut offs which my mum kindly gave to me. I managed to find a bit of navy blue soft leather big enough for the frame I bought.


.....Then I choose this Liberty print I've had for a while which I thought went well with the leather.


I stiffened the cotton with some interfacing and picked out some flowers to appliqué onto the front with my machine (feed dogs down).


I made up the lining in the same liberty print with pockets for my cards....


....added my name on the bag...(a bit geeky - I know)....and found a scrap bit of lace that was luckily just the right length to finish off the back.


I really pleased with it and felt really chuffed when the guy who served me in Anthropology complimented me on it and said 'you could sell them in here you know'....shame he's not a buyer! Maybe one day.....a girl can dream!
If you like the look of this purse...fear not...it will be on the workshop programme at my craft venue and haberdashery shop...opening later this year in Moseley, Birmingham.

Thursday, 2 February 2012

Business cards of my very own

A very exciting thing happened this morning. I was quietly sitting eating breakfast and watching the news ....and then jumped out my skin when I heard a huge bang at the front door. Wondering what on earth had just happened I went to have a look and spotted the 'MOO' sticker on a little box that had just plopped through the letter box.


Woo hoo...my business cards had arrived! I had chosen 5 different images of various habdash bits and bobs that I had lying around to go on the back, so could't wait to see how they had turned out. I'm really pleased with them, it seems so official to finally have 'business cards'! So now I can give my details to other peeps on something thats worth keeping, instead of a quick note on a bit of paper. They are not the final thing though...just something to keep me going until we finalise our logo and branding...so watch this space!


I even got a little box to keep them safe in - love it!

Wednesday, 1 February 2012

Tutorial: How to make a 'Love' banner - bunting style

Now that January is over its time I think its time to forget about the post Christmas/holiday blues. Okay...a February freeze may have been predicted for the UK but there is still plenty to look forward too....longer days...spring flowers...the Olympics...and Valentines day (maybe?) Either way why not bring some love into your life with this cute 3D banner.........read on to find out how....